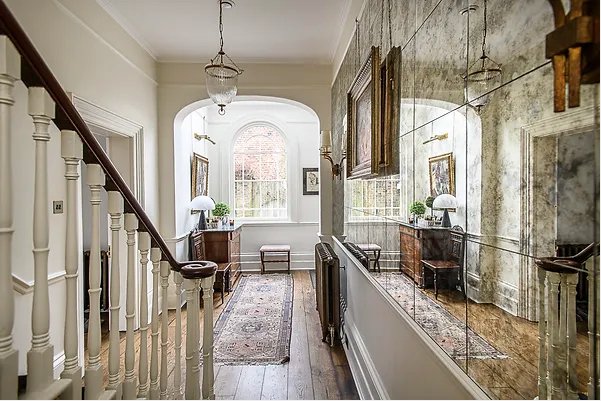
An antique mirror glass feature wall can be a stunning addition to any space, invoking a sense of timeless elegance and charm. Here's how you can create a retro reflection masterpiece:
-
Select the Wall: Choose a wall in your space that you want to highlight. It could be a focal point like the wall behind a fireplace, a kitchen splashback, an cove, or a bath.
-
Measurements: Measure the dimensions of the wall accurately to determine how much antique mirror glass you'll need. Remember to account for any outlets, switches, or other obstructions.
-
Choose the Antique Mirror Glass: We offer to types of antique mirror glass and can provide you with bespoke cuts. Email us with your dimensions and photos of the space you are looking to transform and we will be able to offer advice and support from there.
-
Prep the Wall: Ensure the wall surface is clean, smooth, and free of any debris. If necessary, sand and prime the wall to create a smooth surface for adhering the mirror glass.
-
Layout Design: Plan the layout of the antique mirror glass on the wall. You can create a uniform pattern or opt for a more eclectic arrangement for a retro vibe. Use painter's tape to mark the placement if needed.
-
Adhesive Application: Apply a strong adhesive (see our store) suitable for mirrors onto the back of each piece of antique mirror glass. Follow the manufacturer's instructions for the adhesive application process carefully.
-
Mounting: Carefully place each piece of antique mirror glass onto the wall according to your layout plan. Press firmly to ensure proper adhesion. Use a level to ensure the mirror pieces are straight and aligned correctly.
-
Grout or Sealant (Optional): Depending on the style you're going for, you can choose to leave small gaps between the mirror pieces for a more vintage look, or you can use a grout or sealant to fill in the gaps for a cleaner finish.
-
Finishing Touches: Once the adhesive has fully cured, remove any excess grout or sealant if used. Clean the mirror surfaces with a glass cleaner to remove any smudges or marks, and admire your stunning retro reflections feature wall.
-
Accessorise: Enhance the visual appeal of your antique mirror glass feature wall by complementing it with retro-inspired decor and furnishings. Think vintage furniture, brass accents, and soft lighting to complete the look.
With these steps, you can transform an ordinary wall into a captivating focal point that exudes vintage charm and sophistication.
#retroreflections